Thursday, June 10, 2010

Sometimes it pays to be crafty

Yesterday I downed a Starbucks Doubleshot and kicked apartment ass. I got a ton done including lots of cleaning, some blogging and fixing the very lumpy couch cushions.


The left side finished compared to the right side which is the "before."


How I did it: I cut open the inner pillow. In my couch the pillows each has three sections, so I had to cut into each pillow three times. Inside the stuffing had smooshed together into a big lumpy chunk. Smooshed is a technical term. I ripped the stuffing apart into tiny pieces, pulling it apart will my hands to make it fluffy once again and re-stuffed the cushion. I added some poly-fill to party since I some I hadn't used up in 4 years.


Still not clear whether or not the yellow pieces started out yellow... ew.
I scrubbed my hands really hard afterward.


If you are squeamish or bought your couch used, seriously consider using gloves, or have some around just in case. I didn't use gloves, but my cleaning habits are intermittent. Or I'm gross. However you want to word it.

If you have never stuffed a pillow before, it's important to start at all the corners, then stuff the rest. If you don't the end product will be round where it's supposed to be square. After stuffing, sew your pillows shut and zip the cover back on. You'll likely need to vacuum up AWOL fibers. Ta-da! You're done.

The final product: a comfortable cushion you no longer have to try unsuccessfully to punch into pillow shape everyday.


Didn't you hear how sexy vacuum lines are? It's a hot interior design trend in 2010.


This is by far not my most glamorous project, but considering how nice the couch looks I think it's pretty rad. We got our couch used and I wonder if they got rid of it because of the lumpy pillows. Why replace something when with a little elbow grease you can mend it yourself? Sometimes it pays to be crafty.

Wednesday, June 9, 2010

Kickass Painted Heels


I've been paint on and off for two weeks and finally they are done! I've had these shoes for a while and they are the comfiest heels ever! But the heels had become scuffed after being my go-to heel for the past two or three years. After picking up a similar looking heel at the thrift store for two bucks I finally plucked up the courage to risk ruining my favorite shoes. But I didn't ruin them and personally I think they look fabulous considering my poor painting skills.

I painted them using acrylic paint. Afterward I sprayed it with a seal. I'm all about fixing things instead of replacing them, so the the paint is partly functional. I'll definitely wear these a lot longer than if the scuffs got worse.

Sealing them, plastic bags covering what doesn't need to be sealed.


This was a really fun and challenging project. My ability to paint a thin black line has improved tenfold. If I could change one thing, it'd be the skull which I think looks pretty amateur. Here's a better view:


Also a close up of the waves, since they're the most detailed


What do you think of my shoes? Comments and Criticism welcome

Thursday, June 3, 2010

Plot Update

I thought today I'd share photos of my garden plot. Unfortunately my utter lack of money has led me to only plant half the plot.

Tomatoes, bell peppers, jalapeno, radishes and some cornflowers that haven't bloomed yet.


Ruby corn, spinach, strawberries, peas and out of view are black eye peas.

Wednesday, June 2, 2010

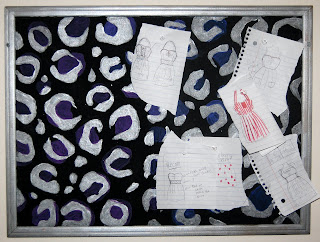
Repainted cork board

I've been working hard on a project that isn't quite ready to share yet. I've very excited to show it off in the next few days.

I've been trying to organize and decorate my little craft corner in our bedroom. I painted this cork board. Previously it was a very unattractive beige wood. I painted (poorly) blue and purple leopard print with silver. I finally got it hanging over my craft table and have already used it for pinning up sewing project ideas.