

Hello again! I'm back to let visitors know that I have a new blog now that I am much more regular about posting to then I ever was for this neglected blog.
Now you can find me at Quill Alley, sharing my crafts and life in Sacramento.
Thanks!
Sarah Jane
Saturday, January 24, 2015


Friday, April 29, 2011
the end of this blog.
It's been fun, but I feel the drive and inspiration I once had for my crafts has fizzled. But I'm working on other projects and finding inspiration in that. My short break from blogging during a busy time in life ended up turning into a long break. I came to the realization that this blog wasn't a project I had both the time commitment and inspiration to see through. And as all things come to an end, so does The Crafteteria.
Thanks to everyone who read my blog, and the entire online crafting community.
signing off,
Sarah Jane Hammontree
http://www.youtube.com/watch?v=1qxSwJC3Ly0Thursday, June 10, 2010
Sometimes it pays to be crafty
Yesterday I downed a Starbucks Doubleshot and kicked apartment ass. I got a ton done including lots of cleaning, some blogging and fixing the very lumpy couch cushions.
 The left side finished compared to the right side which is the "before."
How I did it: I cut open the inner pillow. In my couch the pillows each has three sections, so I had to cut into each pillow three times. Inside the stuffing had smooshed together into a big lumpy chunk. Smooshed is a technical term. I ripped the stuffing apart into tiny pieces, pulling it apart will my hands to make it fluffy once again and re-stuffed the cushion. I added some poly-fill to party since I some I hadn't used up in 4 years.
 Still not clear whether or not the yellow pieces started out yellow... ew.
I scrubbed my hands really hard afterward.
If you are squeamish or bought your couch used, seriously consider using gloves, or have some around just in case. I didn't use gloves, but my cleaning habits are intermittent. Or I'm gross. However you want to word it.
If you have never stuffed a pillow before, it's important to start at all the corners, then stuff the rest. If you don't the end product will be round where it's supposed to be square. After stuffing, sew your pillows shut and zip the cover back on. You'll likely need to vacuum up AWOL fibers. Ta-da! You're done.
The final product: a comfortable cushion you no longer have to try unsuccessfully to punch into pillow shape everyday.
 Didn't you hear how sexy vacuum lines are? It's a hot interior design trend in 2010.
This is by far not my most glamorous project, but considering how nice the couch looks I think it's pretty rad. We got our couch used and I wonder if they got rid of it because of the lumpy pillows. Why replace something when with a little elbow grease you can mend it yourself? Sometimes it pays to be crafty.
 The left side finished compared to the right side which is the "before."
How I did it: I cut open the inner pillow. In my couch the pillows each has three sections, so I had to cut into each pillow three times. Inside the stuffing had smooshed together into a big lumpy chunk. Smooshed is a technical term. I ripped the stuffing apart into tiny pieces, pulling it apart will my hands to make it fluffy once again and re-stuffed the cushion. I added some poly-fill to party since I some I hadn't used up in 4 years.
 Still not clear whether or not the yellow pieces started out yellow... ew.
I scrubbed my hands really hard afterward.
If you have never stuffed a pillow before, it's important to start at all the corners, then stuff the rest. If you don't the end product will be round where it's supposed to be square. After stuffing, sew your pillows shut and zip the cover back on. You'll likely need to vacuum up AWOL fibers. Ta-da! You're done.
The final product: a comfortable cushion you no longer have to try unsuccessfully to punch into pillow shape everyday.
 Didn't you hear how sexy vacuum lines are? It's a hot interior design trend in 2010.
This is by far not my most glamorous project, but considering how nice the couch looks I think it's pretty rad. We got our couch used and I wonder if they got rid of it because of the lumpy pillows. Why replace something when with a little elbow grease you can mend it yourself? Sometimes it pays to be crafty.
Wednesday, June 9, 2010
Kickass Painted Heels
I've been paint on and off for two weeks and finally they are done! I've had these shoes for a while and they are the comfiest heels ever! But the heels had become scuffed after being my go-to heel for the past two or three years. After picking up a similar looking heel at the thrift store for two bucks I finally plucked up the courage to risk ruining my favorite shoes. But I didn't ruin them and personally I think they look fabulous considering my poor painting skills.
I painted them using acrylic paint. Afterward I sprayed it with a seal. I'm all about fixing things instead of replacing them, so the the paint is partly functional. I'll definitely wear these a lot longer than if the scuffs got worse.
 Sealing them, plastic bags covering what doesn't need to be sealed.


This was a really fun and challenging project. My ability to paint a thin black line has improved tenfold. If I could change one thing, it'd be the skull which I think looks pretty amateur. Here's a better view:

Also a close up of the waves, since they're the most detailed

What do you think of my shoes? Comments and Criticism welcome
Thursday, June 3, 2010
Plot Update
I thought today I'd share photos of my garden plot. Unfortunately my utter lack of money has led me to only plant half the plot.
 Tomatoes, bell peppers, jalapeno, radishes and some cornflowers that haven't bloomed yet.

Ruby corn, spinach, strawberries, peas and out of view are black eye peas.
 Tomatoes, bell peppers, jalapeno, radishes and some cornflowers that haven't bloomed yet.

Ruby corn, spinach, strawberries, peas and out of view are black eye peas.
Wednesday, June 2, 2010
Repainted cork board
I've been working hard on a project that isn't quite ready to share yet. I've very excited to show it off in the next few days.
I've been trying to organize and decorate my little craft corner in our bedroom. I painted this cork board. Previously it was a very unattractive beige wood. I painted (poorly) blue and purple leopard print with silver. I finally got it hanging over my craft table and have already used it for pinning up sewing project ideas.
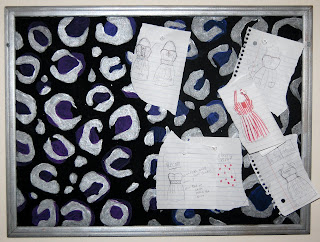
I've been trying to organize and decorate my little craft corner in our bedroom. I painted this cork board. Previously it was a very unattractive beige wood. I painted (poorly) blue and purple leopard print with silver. I finally got it hanging over my craft table and have already used it for pinning up sewing project ideas.

Monday, May 24, 2010
Doll Clothes
Yes, I'm one of those weirdos who likes dolls despite being an adult. I thought I'd share the dress I made recently. I have more doll photos on my flickr account here.
Sewing on such a small scale is definitely a challenge. I think it's fun and a quick project.
Do you like dolls? Do you think they're creepy? I'd love to hear your opinion in the comments.

Sewing on such a small scale is definitely a challenge. I think it's fun and a quick project.
Do you like dolls? Do you think they're creepy? I'd love to hear your opinion in the comments.
Wednesday, May 19, 2010
New Look and Friends Inchies Art
I'm back from my sickness induced break, and even have a new layout! The new look is from Deluxe Templates. If you use blogger you'll love them. They have tons of great templates and even ones suited for specific types of blogs. I'm not being paid to endorse this, just wanted to share a great resource for bloggers.
I didn't get much crafting done but I did want to share something I made and forgot about. Around the holidays, three of my close friends and I did art on inchies. If you aren't familiar with inchies, they are tiny 1 X 1 inch squares for mini art. What you do with them when you're done is up to you but I decided to make more art for our apartment.

This project is a trial run for a larger project. I hope to get all of my closest friends and family to do some inchies and then combine them like this for art in my house. I think inchies are a really fun medium for creativity. Even people who aren't artists can fill up a 1 x 1 inch square and they are super quick to make.
Have you ever collaborated for a creative project?
Friday, May 14, 2010

Thursday, April 29, 2010
Camping
I'll be gone for the weekend. Shipoopi and I are going camping at Lava Beds National Monument. Have a nice weekend!


Sunday, April 25, 2010
A Look Back on my Earliest Crochet
I am 21 and I've been crocheting since I was about 11. The first few years I crocheted I wasn't really involved in the online crochet/craft community. I didn't know such a thing existed. I didn't see all the wonderful amazing things people did with crochet. All I saw was a striped double crochet baby blanket my mom made for a friend and potholders my grandma won in a charity bingo. It was a creative famine in my world of crochet. I learned how to crochet before I knew what I would do with it. I've always been drawn to weaving, crocheting and knitting. It was something I wanted to do just for the sake of doing it. Every time I saw something crocheted, it was new and exciting.
Of course learning was a bull-headed process. My mom tried showing me how to crochet and mostly the process just frustrated me to no end, but out of pure stubbornness I figured out the very basics and went from there.
I think in a way I was lucky. I got to do creative things that I hadn't seen anyone else do before. When I made my checkered scarf, I figured out how to do the color change without cutting any yarn. I had no idea other people knew that "technique." I just loved checkers, loved crochet and hated cutting yarn.

I didn't have patterns in the early days. In fact I've almost never used patterns. I think you learn so much more if you figure out things on your own.
This was my first scarf. Before I knew that there was more than one type of stitch. I didn't know I was doing a back loop single crochet. I just though I was crocheting. I thought it'd be cool to add a pocket. I didn't know how to do a button-hole, so I just figured it out.


I've come a long way and now I'm spoiled by inspiration on a handful of sites for people interested in crocheting and crafts. But I'll probably always have the most pride in the first things I made.
Of course learning was a bull-headed process. My mom tried showing me how to crochet and mostly the process just frustrated me to no end, but out of pure stubbornness I figured out the very basics and went from there.
I think in a way I was lucky. I got to do creative things that I hadn't seen anyone else do before. When I made my checkered scarf, I figured out how to do the color change without cutting any yarn. I had no idea other people knew that "technique." I just loved checkers, loved crochet and hated cutting yarn.

I didn't have patterns in the early days. In fact I've almost never used patterns. I think you learn so much more if you figure out things on your own.
This was my first scarf. Before I knew that there was more than one type of stitch. I didn't know I was doing a back loop single crochet. I just though I was crocheting. I thought it'd be cool to add a pocket. I didn't know how to do a button-hole, so I just figured it out.

This was my second or third scarf. I figured out how to do chevrons and wanted to something with it. I ended up with this weird number.

I've come a long way and now I'm spoiled by inspiration on a handful of sites for people interested in crocheting and crafts. But I'll probably always have the most pride in the first things I made.
Saturday, April 24, 2010
White Cheese with Basil
I made queso blanco from some milk I needed to use up before it went bad. It's a great way to use milk up. How to is on The Homestead Hearth forums, here.
 I've only made it twice but I think it's easy as pie, despite screwing up one of the very few steps. I even did my own little spin of basil mixed in. Easy as pie. Now if I only had some fruit for pie...
 I've only made it twice but I think it's easy as pie, despite screwing up one of the very few steps. I even did my own little spin of basil mixed in. Easy as pie. Now if I only had some fruit for pie...
12 Steps to Keep Your Home Clean
I have a sleep deprived confession to make to you, my loyal blog readers. All 2 of you need to know something about me, something dark and shameful and too horrible to imagine: I am a messy slob.
Yes, it's true. I won't deny it any longer. My whole life I have been one. When I was 14 months old, I left wet towels on the floor. When I As a child, cleaning my room usually meant finding creative out of site places to move my messes to. Usually the crawl space of our apartment. As a teenager, piles of books, papers and yarn were the mosaic of crap that protected the carpet from sun bleaching in my shared bedroom. Now as a young adult, I haven't come very far. I ate a gobstopper out of my desk that had been rattling around in there for at least six months. I always wait until laundry piles (Yes... more than one pile) are waist deep before doing them.... that following weekend. More than I care to admit there is a forest of some kind of mold on the pile of dishes I have yet to hand wash.
 My therapist, Dr. Baldar says "You have deep issues of suppressed teenage rebellion that you express by being slob-like. Not unlike those with bulemia, you hurl your dirty clothes, old reciepts and scraps of fabric all about your human living space in order to gain a sense of control over your life."
To which I reply "You're a cat! You don't have the cognitive capacities to earn a doctorate."
The second step is running to the interwebs for advice. Lately I've reading a lot of articles from women's magazines with titles like 32 Ways to Use Baking Soda to Scrub Away that Empty Feeling in Your Life, Miss Petunia's Tips for Spending More Time in the Kitchen Cleaning, The Huffer's Complete Guide to Bleach presents: 101 Excuses to Clean with Bleach and Why Martha Stewart is Better than You at Everything in Every way.
 The secret to streak free windows isn't vinegar, it's the blue tears of the Na'vi.
The third step is to realize none of step two will help you. The only thing more dysfunctional than how much of a slob I am is the people who need to have their home that perfectly clean. I have been working on being a tidier person, with some success so far. I used to let messes build up until I couldn't stand them another second and I would spend 7 hours straight doing nothing but cleaning. Then I let the cycle of filth to binge cleaning repeat. Lately I've been keeping the living room fairly neat and I've been doing dishes everyday. As time goes by I keep relearning the same thing on new levels: Baby turtle steps towards becoming better. Also the hare loses the race. Or something like that.
Part 2 soon to come.
Yes, it's true. I won't deny it any longer. My whole life I have been one. When I was 14 months old, I left wet towels on the floor. When I As a child, cleaning my room usually meant finding creative out of site places to move my messes to. Usually the crawl space of our apartment. As a teenager, piles of books, papers and yarn were the mosaic of crap that protected the carpet from sun bleaching in my shared bedroom. Now as a young adult, I haven't come very far. I ate a gobstopper out of my desk that had been rattling around in there for at least six months. I always wait until laundry piles (Yes... more than one pile) are waist deep before doing them.... that following weekend. More than I care to admit there is a forest of some kind of mold on the pile of dishes I have yet to hand wash.
 My therapist, Dr. Baldar says "You have deep issues of suppressed teenage rebellion that you express by being slob-like. Not unlike those with bulemia, you hurl your dirty clothes, old reciepts and scraps of fabric all about your human living space in order to gain a sense of control over your life."
To which I reply "You're a cat! You don't have the cognitive capacities to earn a doctorate."
The first step is deciding you have a problem.
The second step is running to the interwebs for advice. Lately I've reading a lot of articles from women's magazines with titles like 32 Ways to Use Baking Soda to Scrub Away that Empty Feeling in Your Life, Miss Petunia's Tips for Spending More Time in the Kitchen Cleaning, The Huffer's Complete Guide to Bleach presents: 101 Excuses to Clean with Bleach and Why Martha Stewart is Better than You at Everything in Every way.
 The secret to streak free windows isn't vinegar, it's the blue tears of the Na'vi.
The third step is to realize none of step two will help you. The only thing more dysfunctional than how much of a slob I am is the people who need to have their home that perfectly clean. I have been working on being a tidier person, with some success so far. I used to let messes build up until I couldn't stand them another second and I would spend 7 hours straight doing nothing but cleaning. Then I let the cycle of filth to binge cleaning repeat. Lately I've been keeping the living room fairly neat and I've been doing dishes everyday. As time goes by I keep relearning the same thing on new levels: Baby turtle steps towards becoming better. Also the hare loses the race. Or something like that.
Part 2 soon to come.
Friday, April 23, 2010
My First Salad
I harvested some of the lettuce from my balcony and made a salad to go with dinner Wednesday evening.

This is the first thing I've grown and then consumed. A first step towards sustainably growing my own food.

This is the first thing I've grown and then consumed. A first step towards sustainably growing my own food.
Thursday, April 22, 2010
Happy Earth Day
Happy Earth day! I thought I'd celebrate earth day on my blog with some of my favorite photos of my limited travels on Earth so far.
 Lava Beds Nation Monument, Ca Fall 2007.
 Lava Beds Nation Monument, Ca Fall 2007.
 White Mountains, Ca Fall 2008. A bristlecone pine.
 Bristlecone Pine, the oldest living trees on the planet. It takes a year to grown this pine cone.
 Mono Lake, Ca 2008.
 Point Reyes June 2008. Taken by my mom!
 Point Reyes June 2008. Doesn't this photo look like a painting?
 Point Reyes, June 2008. I love this photo because you see where the layers of rock folded over on themselves. California has such a rich geological history.
 Yosemite, Ca April 2008
 Yosemite, Ca April 2008
 Death Valley, CA. Spring Break 2009
 Death Valley, CA. Spring Break 2009
 Owens Valley, Spring Break 2009. Climbing into small spaces is one of my hobbies. I'd say I'm a weirdo, but I've seen quite a few other people do it too on all the trips I've gone on.
How are you celebrating Earth Day?
Wednesday, April 21, 2010
The Balcony Garden
An update on my balcony garden: After over a month, it's going great! I have gourmet lettuce mixture, arugula, kale and peas planted. It's going really well, despite the problem with the assholes at my apartments taking out the gutters in rainy march and all my plants and soil in box #1 being washed away. Frustrating at the time, but spring is a forgiving time of year!
 Planter box#1: kale, lettuce mix, arugula, peas.
 Kale.
 Planter box #2: Peas, big lettuce plants, little lettuce plants.
 Another view of box #2.

The peas even have a little flower starting to grow!
Here is the Sacramento area, we've been having unusual weather for the time of year. Usually by April, we've seen all the rain we'll see until fall. But this year it's been intermittent rain. Yesterday we even had hail! Hail is a rare event in this region of the country. I've lived here almost my entire life and I can only remember it hailing maybe 2 or 3 times. The good news is, this weather makes my late start to my garden plots not actually late! And hopefully I'll be able to get the next crop of lettuce before heat makes it bolt. After that, I'll have to look into what plants to replace the lettuce.
Monday, March 8, 2010
A Bit of Dirt: Balcony Planter Boxes on the Cheap
It's not quite spring here in Carmichael, California but it's beginning to feel like it. So far there has been three days warm enough for me to wear shorts. And by "warm enough" I mean temperatures almost in the 60s. A few sunny days is enough to kill my winter blues and make me instead stress about gardening.
This weekend I made a planter box for our sometimes sunny balcony. The balcony doesn't get enough sun to grow things like tomatoes but I think somewhat shade tolerant veggies should do okay.

I have some peas that I mistakenly thought would be a good idea for start here and transplant to the plot, so I have two of them already in the planter box as an experiment to see if I can get them to grow. It's probably a fool-worthy endeavor. Mostly the boxes will be use for spinach, arugula and lettuce.
The box was simple to make, and we'll see how it holds up over time. All in all it was about $20 for the two of them, one medium and one large. I used a simpson bracket, screws and bolts and the plastic planter box.

A Rough How To
Materials needed:
Plastic planter box
2 Simpson brackets (shaped like a squared-off U) for each box
Nuts + Bolts to fit bracket, not too long. 4 for each box, but this may vary if you get a different bracket
Pencil or Pen
Use the holes in the bracket to mark where on the box you want the screw holes. Use a utility knife to cut holes. It doesn't have to be perfect. Insert the screws from inside the planter box. When you are digging in it later you don't want to have a surprise injury from a screw that you forgot was in there! Tighten bolts, Hang on your balcony railing. Make you your box has drainage, and a few rocks covering any drainage hole so you don't lose dirt with the water.
I apologize if I didn't use enough building terminology. It's only because I have no idea what I'm talking about.
Friday, February 19, 2010
Gualala
I'm off to Gualala bright and early tomorrow morning. I thought I'd share a few pictures from my trip there May 2009.
 The view from our room.
 My secret love is Geology. IT ROCKS!
 Yes, it was cold, but it's okay. I couldn't feel anything at that point.
 I loved the misty forests near the ocean.

My wonderful boyfriend Shipoopi is the one to credit for all these lovely photos.
If you'd like to see more, check out my fickr Gualala album here.
Thursday, February 18, 2010
Alien Illusion Scarf
I knitted up the Alien Illusion from Stitch and Bitch. The chart confused the heck of me in the beginning, though I forget why.
If you've never seen or heard of illusion knitting before, it's a way of knitting with two colors, where purl stitches raise one color so an image is seen when it's at an angle.
Face on it looks like this:

From an angle you see the illusion!
 If you want to learn more about illusion knitting, here is a great place to go for how to, and a variety of illusion knitting patterns.
This will be my last completed project for a few days, it's because me and my fella are going to Gualala, a little ocean town a few hours away for the weekend.
Subscribe to The Crafteteria!


 Posts
All Comments
About Me

- Sarah Jane at The Crafteteria
- Carmichael, CA, United States
- I'm Sarah Jane, woman of a 1000 hobbies, master of none. I love to sew, write, knit, crochet, sometimes cook, paint, bedazzle and draw. I also love costumes, dolls and gardening.